Sunday 1 April 2018

Dumbbell lunges

Step 1: Stand with dumbbells in each of your hands on your sides. Keeping your back straight and stretched, lunge forward with left leg. Land on the heel, then forefoot. Tighten your abs for maximum stability.

Step 2: Lower yourself further by adjusting your left hip muscles and flexing the knee, until there is 2 inches gap between the right leg and the floor.

Avoid this mistake: Make sure to keep your back straight at all times. It has been observed that during this exercise many individuals bend their back unintentionally. Not only does that decrease the overall effectiveness of the workout, but also hinders in optimum muscle growth and causes lower back pain in the longer run.

Step 3: Push yourself up from the left leg and repeat the exercise with the right leg.

Barbell squats

Step 1: Grab the barbell bar and place it across your upper back. Push your shoulders back so they stretch while you perform the exercise. Place your feet hip width apart.

Step 2: Lower your body by bending in on your knees and lowering your hip, until your thighs are in parallel to the floor. Keep your abs tight at all times to provide stability. Make sure the back is stretched during the whole movement.

Avoid this mistake: Make sure to keep your back straight at all times. It has been observed that during this exercise many individuals bend their back unintentionally. Not only does that decrease the overall effectiveness of the workout, but also hinders in optimum muscle growth and causes lower back pain in the longer run.

Step 3: Push your hips forward and slowly get up to initial position. Repeat.

Saturday 31 March 2018

LEGS

Muscle Group:

  • Quadriceps
  • Glutes

Exercises:
  1. Barbell squats
  2. Dumbbell lunges
  3. Barbell lunges
  4. Leg press
  5. Hack squats
  6. Leg extensions
  7. Front squats
  8. Cable kickbacks
  9. Bench jump
  10. Single leg squat
  11. Seated leg curls

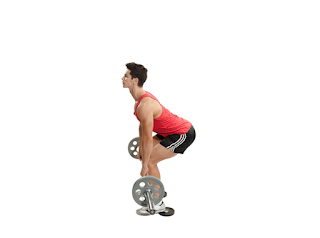
Deadlifts

Step 1: Keep your feet hip distance apart and lower your body while bending down until your thighs are in parallel to the floor. Keep your back straight and in a neutral, natural position at all times. Hold the bar with an overhand grip with your arms outside the knees. Keep your feet slightly pointed outwards.


Caution: Deadlifts, if performed wrongly,can seriously affect spine and cause lower back pain issues. Follow instructions properly to avoid any mishaps.

Step 2: Keeping your abs and hip muscles tight, push up on the legs to lift the bar. Exhale during the process. Keep the back straight.

Step 3: As the bar reaches your knees, push forward with your hip muscles to straighten your body up and further raise the bar till you are standing tall.

Step 4: Hold this position for 2 seconds. Inhale. Then return to the starting position.

Chin-ups

Step 1: Hand on a wide grip pull up bar. Tighten your abs and hip muscles and stretch your arms fully. Retract your shoulders slightly back intentionally to achieve maximum activation of back muscles while pulling up.

Step 2: Pull yourself up steadily on the bar, chest pointed outward. Slowly lower back to initial position. Repeat.

BACK

Muscle Group:

  • Upper back
  • Middle back
  • Lower back

Exercises:
  1. Wide grip chin-ups
  2. Deadlifts
  3. Barbell shrugs
  4. Lat pull-downs
  5. Seated rows
  6. One arm dumbbell rows
  7. Dumbbell shrugs
  8. T-bar bent over row
  9. Back extensions
  10. Good Morning

Friday 30 March 2018

Push Downs

Muscle Group: Triceps
Step 1: Attach a rope extension or a bar to a high cable pulley. Grip the rope/bar with an overhand grip. Place your hands and feet shoulder width apart. Position your forearms upwards and the wrist straight, in line with the arm. Slightly lean forward but keep your back stretched and firm.


Step 2: Using your elbows as the pivot point, pull the rope/bar down till you get maximum tricep contraction and arm gets straight. Tighten your abs and hip muscles to provide stability.


Avoid this mistake: Keep the back straight and avoid and curve. Many people tend to bend their back unintentionally. This leads to lower back pain in the long run. Avoid this by deliberately locking your back in position and keeping your hip and core muscles (abs) tight.

Step 3: Using the elbows as the pivot point, let your arm up slowly back to the starting position.


Diamond pushups

Muscle Group: Triceps
Step 1: Get in a pushup position. Place your hands under your chest, such that the thumb and index fingers of each hand touch each other and form a diamond shape.
Step 2: Keep your back straight as the body is lowered until there is roughly one fist gap between your chest and hands.
Step 3: Stay in low position for 2 seconds then push back to starting position. Repeat.

TRICEPS

Muscle group: Triceps brachii

Exercises:

  1. Diamond pushups
  2. Push downs
  3. Triceps kickback
  4. Dumbbell triceps extensions
  5. Triceps dips
  6. Bar triceps extension
  7. Triceps pushdowns
  8. Seated triceps extension

Decline bench press

Step 1: Lay flat on the decline bench and tuck your feet with the bench support. The bar will be above your chest when racked. It is recommended to use a spotter when using a free bar to eliminate the risk of dropping the weights on the sides or yourself.

Step 2: While keeping the legs and hips tight, push the bar above and bring it directly over the lower chest. Slowly lower it towards your lower chest. As a rule of thumb, the lowest distance between the bar and your chest should be just enough to allow a fist to fit in.

Avoid this mistake: Many people tend to bend their wrist for extra support unintentionally. This leads to the danger of cracking your wrist or permanent wrist damage. Avoid this by deliberately keeping the wrist in a neutral straight position, supporting the bar firmly by the lower side of palm and locking it.

Step 3: Hold the bar steady in this position for a second then slowly lift back to initial position. Repeat.

Incline bench press

Step 1: Lay flat on the incline bench and place your feet flat apart on the ground. The bar will be slightly behind your head when racked. It is recommended to use a spotter when using a free bar to eliminate the risk of dropping the weights on the sides or yourself.

Step 2: While keeping the legs and hips tight, push the bar above and bring it directly over the center of your chest. Slowly lower it towards your chest. As a rule of thumb, the lowest distance between the bar and your chest should be just enough to allow a fist to fit in.


Avoid this mistake: Many people tend to bend their wrist for extra support unintentionally. This leads to the danger of cracking your wrist or permanent wrist damage. Avoid this by deliberately keeping the wrist in a neutral straight position, supporting the bar firmly by the lower side of palm and locking it.

Step 3: Hold the bar steady in this position for a second then slowly lift back to initial position. Repeat.

Straight bench press

Muscle Group: Middle Chest
Step 1: Lay flat on a bench and place your feet flat on the ground. The bar will be slightly behind your head when racked. It is recommended to use a spotter when using a free bar to eliminate the risk of dropping the weights on the sides or yourself.
Step 2: While keeping the legs and hips tight, push the bar above and bring it directly over the center of your chest. Slowly lower it towards your chest. As a rule of thumb, the lowest distance between the bar and your chest should be just enough to allow a fist to fit in.
Step 3: Hold the bar steady in this position for a second then slowly return back to initial position. Repeat.

CHEST

Muscle group: Pectoralis
  • Upper chest
  • Middle chest
  • Lower chest
Exercises:
  1. Straight bench press
  2. Incline bench press
  3. Decline bench press
  4. Dumbbell press
  5. Cable crossover flys
  6. Pushups
  7. Pec deck flies
  8. Incline pushups
  9. Decline pushups
  10. Single arm pushups

Dumbbell rear raises

Step 1: Sit on the bench inclined forward. Place your feet close together on the ground and make sure to keep the back straight.
Step 2: Raise the dumbbells to the side by keeping your fists pointing towards the ground. Inhale during the process.
Avoid this mistake: Keep the back straight and not slouching on your knees. Many people tend to bend their back for extra support unintentionally. This leads to lower back pain in the long run. Avoid this by deliberately locking your back in position and keeping your hip muscles tight.
Step 3: Slowly lower the dumbbells back to the starting position as you exhale. Repeat.

Dumbbell side raises

Step 1: Stand with your feet shoulder width apart. Hold the dumbbells in each hand by an underhand grip (palms down). Keep your arms rested on your sides.

Step 2: Raise both dumbbells simultaneously to the sides upto the shoulder height, keeping the elbows slightly bent. Inhale during the process. Make sure to keep the back straight.

Avoid this mistakeMany people tend to bend their back for extra support unintentionally. This leads to lower back pain in the long run. Avoid this by deliberately locking your back in position and keeping your hip muscles tight.

Step 3: Slowly let the dumbbells down as you exhale. Repeat.